“AI agent” is one of the most overused terms in tech right now, but the core idea is surprisingly small. An agent is a language model that can call tools you give it, look at the results, and decide what to do next, repeating until the task is finished. In this tutorial we will build one from scratch in about 100 lines of Python, so you can see every moving part instead of hiding it behind a framework.
By the end you will have a small command-line agent that can do maths precisely and read files from a folder you choose, and you will understand the loop that powers much bigger agents.
What makes something an “agent”?
A normal chatbot call is one request and one response: you send a prompt, the model sends text back. An agent adds two things:
- Tools. You describe functions the model is allowed to use, such as “add two numbers” or “read a file”. The model cannot run them itself; it asks you to run them.
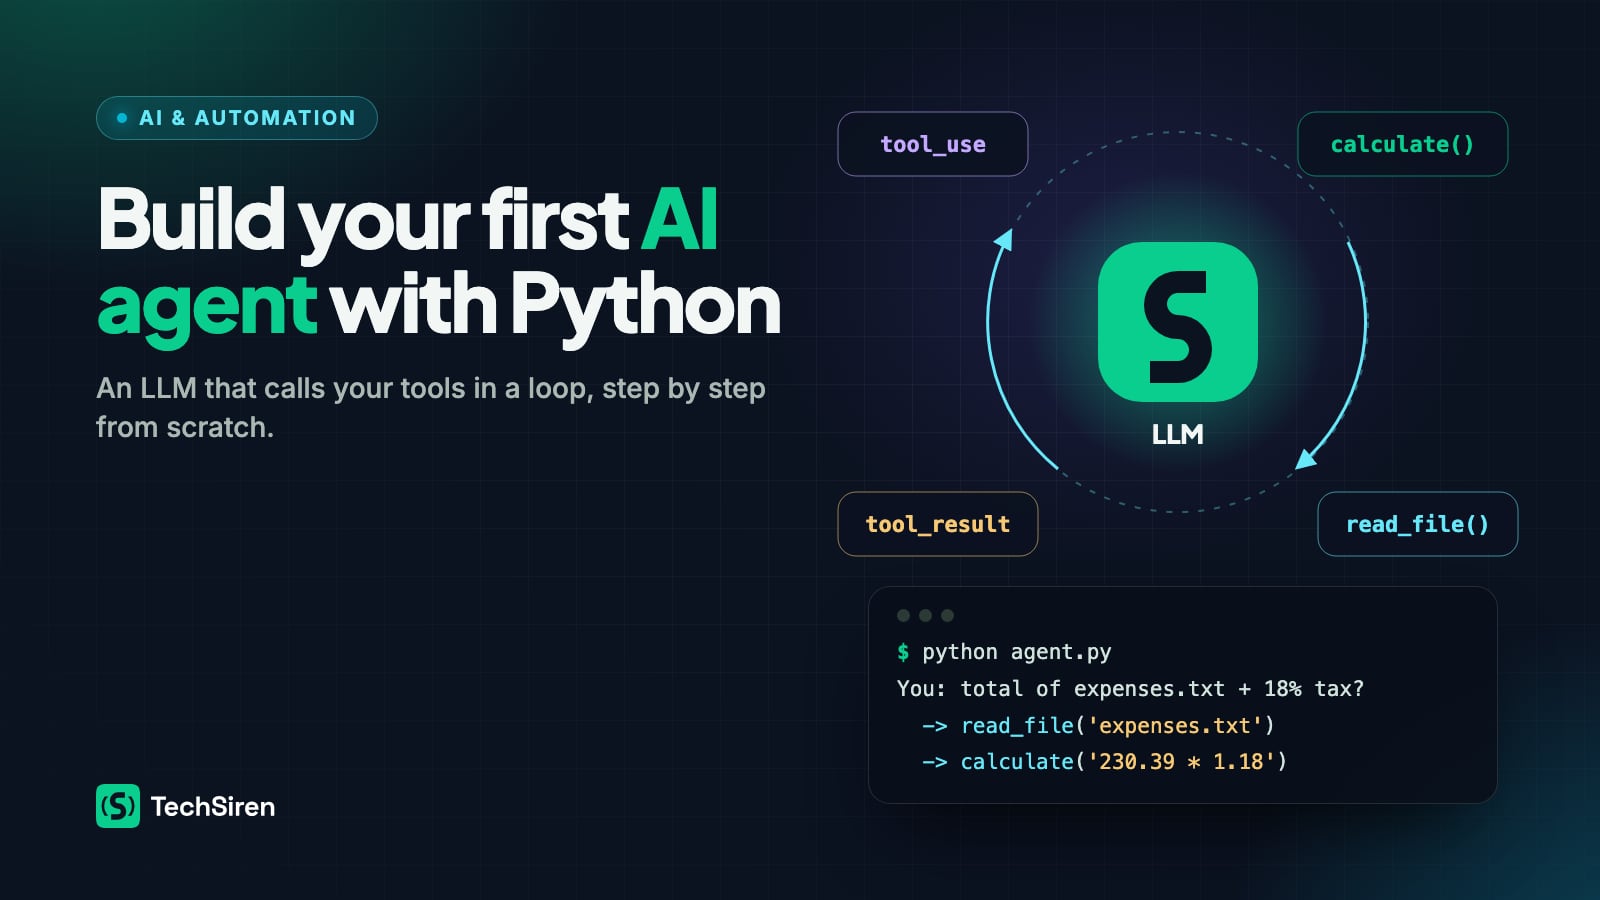
- A loop. Your code runs the requested tool, sends the result back to the model, and asks again. This continues until the model says it is done.
That’s it. Everything else (memory, planning, multiple agents) is built on top of this loop.
The model decides what to do. Your code decides what is allowed and actually does it.
That split is important for safety: the model never touches your computer directly. It can only request the tools you expose, and your code can refuse.
Set up the project
You need Python 3.10 or newer and an API key. This guide uses Anthropic’s Claude models through the official anthropic Python SDK, but the same loop works with any LLM API that supports tool calling.
Create a project folder and a virtual environment, then install the SDK:
mkdir my-first-agent && cd my-first-agent
python3 -m venv .venv
source .venv/bin/activate   # on Windows: .venv\Scripts\activate
pip install anthropic
Create an API key in the Anthropic Console and expose it as an environment variable. Never paste keys directly into your code or commit them to Git.
export ANTHROPIC_API_KEY="your-key-here" # on Windows (PowerShell): $env:ANTHROPIC_API_KEY="your-key-here"Step 1: Make a single model call
Before adding tools, check that a plain request works. Create hello.py:
import anthropic

client = anthropic.Anthropic()  # reads ANTHROPIC_API_KEY from the environment

response = client.messages.create(
    model="claude-opus-5-5",
    max_tokens=16000,
    messages=[{"role": "user", "content": "Explain what an API is in one sentence."}],
)

for block in response.content:
    if block.type == "text":
        print(block.text)
Run python hello.py. If you see a one-sentence answer, your setup is working. Notice that response.content is a list of blocks, not a single string. That matters in a moment, because tool requests arrive as their own block type.
Step 2: Describe your tools
A tool definition has three parts: a name, a plain-English description the model reads to decide when to use it, and an input_schema (JSON Schema) describing the arguments.
We will give our agent two tools:
calculate: evaluates a basic arithmetic expression exactly. Language models are good at reasoning but can slip on long arithmetic, so delegating it to real code is a classic agent pattern.read_file: reads a text file, but only inside aworkspacefolder that you control.
Create agent.py and start with the tool definitions:
import ast
import operator
from pathlib import Path

import anthropic

client = anthropic.Anthropic()
MODEL = "claude-opus-5-5"
WORKSPACE = Path("workspace").resolve()

TOOLS = [
    {
        "name": "calculate",
        "description": "Evaluate an arithmetic expression exactly. Supports + - * / ** and parentheses. "
                       "Use this for any calculation instead of doing maths in your head.",
        "input_schema": {
            "type": "object",
            "properties": {
                "expression": {"type": "string", "description": "For example: (1250 * 0.18) + 42"}
            },
            "required": ["expression"],
        },
    },
    {
        "name": "read_file",
        "description": "Read a UTF-8 text file from the user's workspace folder. "
                       "Pass a path relative to the workspace, e.g. 'notes/todo.txt'.",
        "input_schema": {
            "type": "object",
            "properties": {"path": {"type": "string"}},
            "required": ["path"],
        },
    },
]
Step 3: Implement the tools safely
Now write the Python functions that actually do the work. Two safety details are worth copying into every agent you build:
- The calculator does not use
eval().evalwould run any Python the model produced. Instead we parse the expression and allow only numbers and arithmetic operators. - The file reader resolves the path and checks it stays inside the workspace, so a request like
../../.ssh/id_rsais rejected.
OPERATORS = {
    ast.Add: operator.add, ast.Sub: operator.sub, ast.Mult: operator.mul,
    ast.Div: operator.truediv, ast.Pow: operator.pow, ast.USub: operator.neg,
}


def safe_eval(node):
    if isinstance(node, ast.Constant) and isinstance(node.value, (int, float)):
        return node.value
    if isinstance(node, ast.BinOp) and type(node.op) in OPERATORS:
        return OPERATORS[type(node.op)](safe_eval(node.left), safe_eval(node.right))
    if isinstance(node, ast.UnaryOp) and type(node.op) in OPERATORS:
        return OPERATORS[type(node.op)](safe_eval(node.operand))
    raise ValueError("Only numbers and + - * / ** ( ) are allowed")


def calculate(expression: str) -> str:
    tree = ast.parse(expression, mode="eval")
    return str(safe_eval(tree.body))


def read_file(path: str) -> str:
    target = (WORKSPACE / path).resolve()
    if not target.is_relative_to(WORKSPACE):
        raise PermissionError("That path is outside the workspace folder")
    return target.read_text(encoding="utf-8")[:20_000]  # keep results a sensible size


def run_tool(name: str, tool_input: dict) -> str:
    if name == "calculate":
        return calculate(tool_input["expression"])
    if name == "read_file":
        return read_file(tool_input["path"])
    raise ValueError(f"Unknown tool: {name}")
Step 4: Write the agent loop
This is the heart of every agent. We keep a messages list as the conversation history and loop:
- Send the history and the tool list to the model.
- If it answers normally (
stop_reason == "end_turn"), we are done. - If it asks for tools (
stop_reason == "tool_use"), run each one and send back atool_resultthat carries the matchingtool_use_id.
def run_agent(task: str, max_steps: int = 10) -> str:
    messages = [{"role": "user", "content": task}]

    for _ in range(max_steps):
        response = client.messages.create(
            model=MODEL,
            max_tokens=16000,
            system="You are a careful assistant. Use the tools when they help, and say which files you read.",
            tools=TOOLS,
            messages=messages,
        )

        if response.stop_reason == "refusal":
            return "The model declined this request."
        if response.stop_reason != "tool_use":
            return "".join(b.text for b in response.content if b.type == "text")

        # Keep the assistant turn (including its tool_use blocks) in the history
        messages.append({"role": "assistant", "content": response.content})

        tool_results = []
        for block in response.content:
            if block.type != "tool_use":
                continue
            print(f"  -> {block.name}({block.input})")
            try:
                result = {"type": "tool_result", "tool_use_id": block.id, "content": run_tool(block.name, block.input)}
            except Exception as error:  # report failures to the model instead of crashing
                result = {"type": "tool_result", "tool_use_id": block.id, "content": f"Error: {error}", "is_error": True}
            tool_results.append(result)

        # All results go back together in ONE user message
        messages.append({"role": "user", "content": tool_results})

    return "Stopped: reached the step limit."


if __name__ == "__main__":
    WORKSPACE.mkdir(exist_ok=True)
    while True:
        task = input("\nYou: ").strip()
        if task.lower() in {"", "exit", "quit"}:
            break
        print(f"\nAgent: {run_agent(task)}")
A few details here prevent the most common beginner bugs:
- Append the whole
response.content, not just its text. The model needs to see its owntool_useblocks next to your results. - Every
tool_resultmust reference thetool_use_idit answers. The model may request several tools at once; send all of their results back in a single message. - Errors become results. If a tool fails, return the error text with
is_error: True. The model can usually recover, for example by fixing a typo in a file name. - Cap the number of steps.
max_stepsstops a confused agent from looping forever and running up your bill.
Step 5: Try it
Put a file in the workspace, for example workspace/expenses.txt:
Domain renewal: 14.99
Hosting (12 months): 95.40
Logo design: 120
Run python agent.py and ask a question. You should see something like this:
You: Read expenses.txt and tell me the total, then what it would be with 18% tax.
  -> read_file({'path': 'expenses.txt'})
  -> calculate({'expression': '14.99 + 95.40 + 120'})
  -> calculate({'expression': '230.39 * 1.18'})
The printed arrows show the agent working: it decided on its own to read the file first, then made two exact calculations, and finally wrote an answer using the results. Exact wording varies from run to run, because the model chooses its own steps. That is the point of an agent.
Guardrails and costs
Agents are powerful because they act on their own, so build in limits from day one:
- Least privilege. Only expose the tools the task needs. A read-only file tool is far safer than one that can write or delete.
- Validate inputs in your tool functions, as we did with the workspace check and the safe calculator. Treat tool arguments like any untrusted user input.
- Human approval for risky actions. For tools that send emails, spend money or change data, ask the user to confirm inside the tool function before acting.
- Watch token usage. Every loop iteration resends the conversation, so long sessions cost more.
response.usagereports the input and output tokens of each call, which is useful for logging. - Handle refusals and errors. We check for
stop_reason == "refusal". In production, also catch the SDK’s typed exceptions (for exampleanthropic.RateLimitError) and retry sensibly.
Where to go next
You now understand the loop that sits under every agent framework. Some natural next steps:
- Let the SDK run the loop. Once you understand it, the Python SDK’s tool runner (
client.beta.messages.tool_runnerwith the@beta_tooldecorator) can drive the same loop for you with less code. - Add more tools, such as a web search tool, a tool that queries your own database, or one that calls an internal API.
- Give it memory by saving useful facts to a file between sessions.
- Stream responses so long answers appear word by word.
The best way to learn is to give your agent one small, real job you do every week, and grow it from there. If you build something with this, let me know on YouTube or X.